
I’ve been a weather geek (or as weather geeks would write it: “Wx geek”) since 2001, when I bought an Oregon Scientific WMR968 weather station. Within a couple of years, I’d connected my weather station’s console via a serial cable to a dedicated computer in my basement running Windows 95 and Ambient’s Virtual Weather Station (VWS) software, which grabbed data from my weather station and uploaded it to my personal web server every 20 minutes. Here’s what the “Jenkins Weather Channel” (as I called it) looked like at 3:00 a.m. on June 17, 2006:

Jenkins Weather Channel circa June 2006.
And for the past 9+ years, until very recently, that’s still exactly what my personal weather website looked like. That’s because at some point between 3:00 – 3:20 a.m. on June 17, 2006… my Oregon Scientific weather station died. 🙁
The WMR968 is now discontinued, and Oregon Scientific has since replaced it with the WMR200 “Professional” Weather Center. But back in 2006, with lots of other stuff going on in my life, replacing my weather station took a low priority.
But I never stopped being a Wx geek, and I never stopped wanting to eventually replace my dead weather station with something more commercial-grade.
Best. Christmas. Ever.
Fast forward to December 25, 2014… when Santa brought me something that had been on my Christmas list for a very long time: a Davis Vantage Pro2 weather station. Behold its glory!

Santa brought me a Davis Vantage Pro2!
I couldn’t wait to bust into that box, and before the new year arrived, my new baby was securely mounted to a fence post (ignore the back of my neighbor’s house):

Davis Vantage Pro2 installed
Within seconds of turning it on, data from my Davis weather station was streaming wirelessly to a fancy LCD console in my office:

Davis VP2 Console
Sharing is Caring
I was loving my new toy, but after a few short days, I once again felt the urge to upload my weather data for all the world to see. But a lot has changed since 2003. For one thing, you no longer have to go through the trouble of hosting your own website to share your weather data online. A number of popular web-based services now exist that invite amateur weather watchers to report, track, analyze, and share data from personal weather stations around the world, including Weather Underground, WeatherCloud, AWEKAS, WeatherBug, and PWS Weather (just to name a few). Even NOAA (the U.S. Federal weather tracking agency) accepts user-submitted weather data over the Internet through its Citizen Weather Observer Program (CWOP). It’s really a great time to be a Wx geek!
To take advantage of these web-based services, I went on a search for a method to quickly, easily, and reliably upload data from my Davis weather station to the Internet. Thinking it was probably a long shot, I started by emailing Ambient’s customer service department to ask if my 2003 license of their Virtual Weather Station software was still valid. To my surprise, it was — and it entitled me to a free upgrade to the latest version of their software! My research revealed that Ambient’s VWS is still a popular choice for storing and uploading weather data. In fact, my father-in-law has a Davis Vantage Vue system (the little brother of the Vantage Pro2), and uses VWS to upload his weather data from Graham, Washington to Weather Underground (his station is KWAGRAHA4).
However, the main drawback of VWS (and other programs like it) is that it always has to be running on your computer, which means one more program running in the background using system resources. It also means that whenever you shut down or reboot your computer (or if your computer crashes!) you’ll stop collecting data. That’s not a huge deal for some, as there are still plenty of VWS users out there. I was about to go that route, but then my research uncovered a solution that combined such functionality and simplicity that I couldn’t resist giving it a try: a “bridge” device that plugs directly into my weather station’s console and uploads data directly to the Internet, without any need for a separate PC.
A Dedicated Weather “Bridge”
Uploading data from a weather station’s console to the Internet normally requires three things:
- A data-logging cable that plugs into your weather station’s console one one end, and has a USB or serial connector on the other end.
- A computer that’s turned on 24/7 with an Internet connection and a USB or serial port to connect the cable.
- Software running on the computer that grabs the data from the console and uploads it to web-based services.
But what if you could combine the computer and software into a tiny low-powered device? And by “tiny” and “low-powered,” I mean less than 3″ x 3″ x 1″ in size, less than 2oz in weight, and consuming less than 1-2 watts?
With MeteoBridge, that’s exactly what you can do.
What is MeteoBridge?
MeteoBridge is an OpenWRT-based embedded Linux firmware that runs on miniature routers. A MeteoBridge-powered mini-router takes the place of a PC and sits “between” your weather station’s console and your network, like this:

A standard MeteoBridge hardware configuration
A data-logging cable (#1) connects your weather station’s console to a USB port on the mini-router. The mini-router is powered via a standard micro-USB port (#3), and connects to your local network via WiFi or an Ethernet cable (#2).
The hardware page of MeteoBridge’s Wiki lists all the compatible mini-routers, but I highly recommend the TP-Link TL-MR3020 (pictured in the example above), or its slightly bigger brother the TP-Link TL-MR3040. Both units are small portable Wireless N routers designed for use with 3G/4G USB cellular modems, both are priced around $35 on Amazon, and the only difference between them is the TL-MR3040 has an internal battery, which makes it larger. I chose the smaller TL-MR3020, because I didn’t need the battery backup (I had an available plug on the battery backup unit in my office anyway), and I found a refurbished one on Amazon for under $30.
If you’ve ever upgraded the factory firmware on your home’s WiFi router, or flashed your router with 3rd party open source firmware (such as DD-WRT, Tomato, or OpenWRT), you can easily flash the MeteoBridge software by simply using the mini-router’s factory firmware upgrade interface. Just download the correct .bin file for your mini-router from the MeteoBridge website, then follow their “Getting Started” instructions.
Flashing the MeteoBridge firmware is easy. Follow the instructions in the Getting Started guide to connect your computer via Ethernet cable your mini-router’s Ethernet port, then access the TP-Link setup screen (default username and password on the TP-Link devices are both “admin”). It will look like this:

TP-Link default setup screen
Ignore the buttons on the screen and go to System Tools in the left column, then select Firmware Upgrade:

TP-Link Firmware Upgrade Screen
Let the system upgrade, but do not be in a rush. Let it sit for 10 minutes if you have to. You won’t need to unplug the power from the mini-router at all — it will reboot as a MeteoBridge device on its own.
You can download MeteoBridge for free and try it out (with no feature limitations) for 14 days. If you love it, you can register it via PayPal for 65 Euros — which is currently about $74 USD (registration comes with free software upgrades for life). In total, the DIY approach of buying a compatible mini-router and flashing MeteoBridge yourself will cost you right around $109.
However, if the thought of flashing new firmware onto a device fills you with dread, MeteoBridge has partnered with Ambient, who offers their WeatherBridge device for $199. It’s the same device and the same software, but it comes with support from Ambient (which is excellent). The DIY route really isn’t that hard, and you’ll end up with exactly the same thing at close to half the price, but if you’re not-so-technically savvy, the the extra $90 might be worth the convenience to you.
Connecting MeteoBridge to your Weather Station Console
As I mentioned above, any method of transferring data from your weather station to the Internet requires a USB data-logger cable (or a serial data-logger with a USB adapter) that’s compatible with your weather station’s console, and MeteoBridge is no exception.
If you have a Davis weather station (like me and many others), you have two choices. You can buy the “official” Davis WeatherLink data-logger for around $135 on Amazon. Davis’ official data-logger also comes with their WeatherLink software… which almost nobody uses because everyone agrees it’s crap. The Davis cable looks like this:
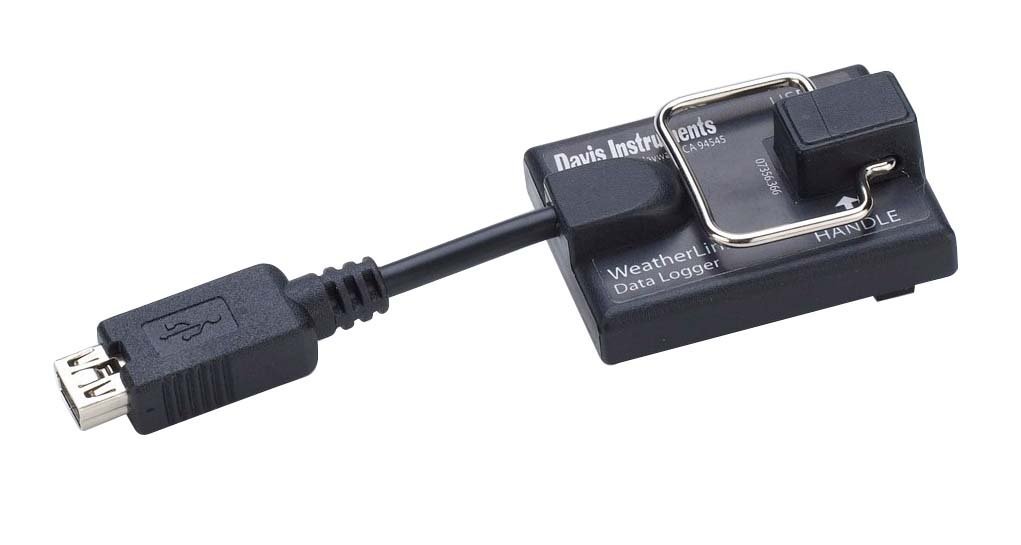
Davis data-logger
The second option is to spend 55 British Pounds (currently about $82) on a “clone” of the Davis WeatherLink data-logger, built by a gentleman in England who is well-known around the Wx discussion forms as “Belfryboy.” His USB Davis logger clone is commonly referred to as a Belfryboy cable:

A Belfryboy clone USB data logger attached to a Davis Envoy weather console.
Belfryboy’s cable for two reasons. First, it’s substantially less expensive than the Davis cable. Second, the official Davis cable is a USB 1.1 cable, so it requires you to use a USB 2.0 hub (like this one) between the cable and the MeteoBridge (to avoid transmission errors), while the Belfryboy is reportedly a USB 2.0 cable, and therefore doesn’t need the hub (more on that below).
Tips to Save Yourself Problems Later
Before jumping into the how-to portion of this post, here are two tips (submitted by reader “kwsherwood” in the comments) that will help avoid problems later. First, make sure have an AC adapter to power your Davis console, instead of batteries. Second, the order in which you power and connect your devices matters. Power your MeteoBridge (or WeatherBridge) device first, then connect the USB data-logger cable from the MeteoBridge device to the David console, then turn on the Davis console.
My MeteoBridge Hardware Setup
Here’s a quick peek at my MeteoBridge hardware setup:

My MeteoBridge hardware setup
On the bottom edge is my Ethernet cable (back cable with yellow connector) and a mini-USB cable providing power from a battery-backup. On the right edge, a 2-port mini USB 2.0 hub is plugged into the mini-router’s USB port, and my Belfryboy data-logger cable from my weather station console is plugged into one of the USB hub’s ports. Even though some users claim that the Belfryboy cable doesn’t need the hub, MeteoBridge’s author encouraged me to use one anyway, so I did. The MeteoBridge instructions explain what each of of the LED lights mean, but I didn’t bother to check because everything just worked.
Setting Up MeteoBridge
Whether you choose to flash MeteoBridge on a mini-router yourself, or purchase the Ambient WeatherBridge that already has the software installed, setting up MeteoBridge for the first time is easy. Because I’m already pretty familiar with network device interfaces, I didn’t even bother reading the manual… and was still up and running in just a few minutes. For the more responsible among you, however, I recommend reading either Ambient’s WeatherBridge Quick Start Guide (in PDF), or read through the Setup section of the MeteoBridge Wiki — both of which can walk you through it step by step.
I’ll also walk through the setup here, both to explain how I did it, and review my experience. Version 2.5 of MeteoBridge (which I used for this review) has seven tabs across the top of its web interface. First up is the Setup Network tab:

MetoBridge “Setup Network” tab
MeteoBridge automatically sensed my local WiFi network (which I selected from the drop-down), which meant all I had to do was enter my WiFi password in the Passphrase field — and my MeteoBridge was successfully connected to my local network. I plugged an Ethernet cable between the MeteoBridge and a network switch in my office, then changed the connection type to LAN. Once again, it connected instantly.
Notice the bright read System Messages at the top of the web interface? Those are why I didn’t bother reading the manual. I just followed those instructions, and was done in no time. And since the first message is telling us to visit the Select Station tab, that’s where we’ll go next!

MeteoBridge “Select Station” tab
As you can see from this tab, MeteoBridge supports a lot of different weather stations (here’s the complete list). But my Davis Vantage Pro2 was right up top, so I selected it. When I did, MeteoBridge warned me in the System Messages that “This combination of hardware platform, firmware and weather station needs a USB 2.0 Hub to have the weather station connected.” As I mentioned above, that’s definitely true if you’re using the Davis-branded USB data-logger, but I decided not to chance it and connect through a small USB 2.0 hub (which was less than $10 on Amazon) anyway.
Next, I entered in the altitude of my weather station, and left the rest of the values at their defaults (though I can see how those corrections and offsets could come in handy if needed). With this tab squared away, it was time to move on to the Weather Network tab.

MeteoBridge “Weather Network” tab
The Weather Network tab is where the MeteoBridge really gets down to business. For my initial test, I decided to just add one weather network (I suggest you do the same at first). I selected Weather Underground fro the drop-down list, entered in my Station ID and password for my Weather Underground account (which I’d created prior to connecting the MeteoBridge), and pressed Save. A few seconds later, green check marks appeared next to each field, confirming that MeteoBridge had successfully been able to connect to Weather Underground. I went to check my WU personal weather station page, and was thrilled to see my weather data appearing before my eyes. I was stunned at how quickly and easily MeteoBridge had been able to fulfill its mission. I quickly started setting up additional weather network accounts, and adding them to MeteoBridge’s Weather Network tab, which now looks like this:

MeteoBridge “Weather Network” tab with all my networks configured
The Push Services tab is next in order, but it’s for more advanced use, so I didn’t touch it at all for my initial setup and testing. I have recently begun to play with it, however, so I’ll talk more about that in a little bit. Let’s jump to the System tab:

MeteoBridge “System” tab
The System tab, as its name suggests, tells you about of the system-level status of what’s going on with your MeteoBridge device, and provides an interface for upgrading firmware versions and backing up or restoring your configuration settings. I set my local timezone and entered in the latitude and longitude of my station. This is also where you can set a new remote access password (which you should do immediately). The Messages section (at the bottom of the screen) is also a great place to see what’s happening “under the hood” and check for any problems (I’ve had none so far).

MeteoBridge “License” tab
The License tab tells you how many days you have left on your free trial, and allows you to pay for a license key via PayPal. For what this software does, 65 Euros (around $74) is a steal. I’d be curious to know the average trial length before most people end up registering. You get 14 days to decide, but it only took me 14 minutes to know it was well worth the money.

MeteoBridge “Live Data” tab
The Live Data tab provides exactly what you’d expect: live data as it’s collected from your weather station console. This tab also provides confirmation of the last time MeteoBridge was able to successfully upload data to each of your selected weather networks. At the bottom, this screen shows historical highs and lows in the Historical Data section, where you can manually update any of the historical values. This came in extremely handy in my testing, since I’d had my weather station online since December 31st of last year, but didn’t get my data-logger cable until late January, meaning I’d missed out on a couple weeks’ worth of data. I was able to manually update accurate rain totals and well as max and min values for a number of measurements in MeteoBridge, based on the max and min values stored by my console.
Testing the Web-Based Services
As you can see from my Weather Network tab, I’ve set my MeteoBridge to send data to various web-based weather collection services at extremely close intervals (from 5 second “Rapid Fire” on Weather Underground to 10 minutes on WeatherCloud). Rather than tell you how well it’s working, I’ll show you. Feel free to check my weather station’s pages on any of these web-based services:
- My Weather Underground Page
- My WeatherCloud Page
- My PWS Weather Page
- My WeatherBug Page
- My AWEKAS Page
- My CWOP Page
MeteoBridge makes pushing data to each of these services (and more) as simple as entering your account info and pressing Save. I can’t imagine how it could be any easier.
Advanced MeteoBridge Usage
MeteoBridge’s ability to update popular web-based weather sites alone is worth the price of admission, but the features don’t stop there. On the Select Station tab, MeteoBridge also includes native support for a Ubiquiti AirCam on your network if you want to upload webcam shots to weather sites that support it. If you don’t have an AirCam, it allows you to select graphics file from any remote URL that’s shared from another webcam. I plan on experimenting with my Logitech Alert security camera, and will update this review based on my experiences.
But where you can really start to get fancy with MeteoBridge’s advanced features is on the one tab we haven’t reviewed yet: the Push Services tab.

MeteoBridge “Push Services” tab
The Push Services tab has a number of pre-set options that allow you to send weather updates to a Twitter account, via email with an SMTP server, to a MySQL database, or to a remote server via FTP. You can easily configure the updates to happen based on a certain time period (such as every 30 minutes), or at one specific time daily, or even on an alarm condition (send a tweet whenever the wind speed exceeds 30 MPH). This opens up a host of additional options for storing and distributing your weather data (UPDATE: See my post on connecting MeteoBridge to a MySQL server).
For a test of its more advanced features, I chose to try out MeteoBridge’s FTP push service and HTTP GET function. To test these features, I decided to do the same thing I did back in 2003: build a dedicated personal weather website and host it on one of my web servers. Thankfully, using the popular Saratoga templates and a number of open source PHP scripts, this task was far easier today than it was 12 years ago. I won’t go into all the how-to details here, but after reviewing the instructions on the MeteoBridge Push Services Wiki page and the Saratoga template pages, with a little tinkering I was able to get a decent-looking weather website for my neighborhood online in just a few hours, fed with real-time data from MeteoBridge’s Push Services. Check it out at http://weather.lakewebster.com/. My favorite page to watch is my Weather Gauges page, which looks like this:

My personal weather website powered by MeteoBridge, Saratoga Templates, and Stainless Steel Gauges scripts
I feel like I’m still just scratching the surface of what I can do with my weather data, but even the “basic” advanced features of MeteoBridge are impressive.
Final Thoughts
One of the reasons I was quick to give MeteoBridge a try is because I figured my experience flashing and tinkering with DD-WRT (and Tomato, and other third-party firmwares) would come in handy, since many of those types of packages require a decent amount of geekiness and tinkering to get working. But that was not the case with MeteoBridge. It was boringly easy to get installed, configured, and running. It’s displayed zero technical problems since I turned it on, and on the two occasions I’ve emailed the author with a question as I tinkered with the more advanced options, his response was quick and helpful. Peer support for MeteoBridge is also strong, as a number of expert users across various Wx forums have plenty of experience with it.
When considering the price (of both the hardware and software), the option of a free 14-day trial, and the ease of setup and configuration, I have no reservations recommending MeteoBridge to anyone who wants to get their weather data online with minimal cost and effort.
As always, I welcome your questions, comments, and feedback below!
Things You’ll Need to Do This Project
- A mini router like the TP-Link TL-MR3020
- A USB data-logger compatible with your weather station console (Davis users can use the Davis one or the Belfryboy one)
- A mini USB 2.0 hub
- MeteoBridge software


